Growing Veggies in Straw Bales
This is the fourth and final page in the series of growing vegetables in straw bales. Click Here to go back to page 1.
Meanwhile we continue on with the rest of the top ten veggies to grow either in straw bales or a conventional garden – maybe even a Raised Bed Garden ?
?
Cucmber:
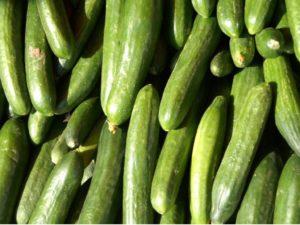
A popular salad vegetable, this is a fast growing cClimbing plant that definitely prefers the heat; and if properly attended to, each plant will provide a number of fresh cucumbers throughout the growing season.
Planting: The cucumber needs full sun and can be grown along the ground, or as a climbing plant growing up a trellis or garden net; therefore you must decide before planting just how you would prefer it to grow.
If planting from seed then grow inside in a warm place (65 degrees is needed for germination) and do not transplant outside until at least two weeks after the last frost.
Seeds should be sown in rows about 1 inch deep and 6 inches apart. Once they are ready for transplanting, then plant the young seedlings about 12-18 inches apart. Cucumber is very susceptible to the frost so I would keep a fleece covering at hand to cover for the first week or so after planting.
Cucumbers prefer a neutral or slightly alkaline soil with a pH around 7. Compost with plenty of well-rotted manure and other organic material will produce an excellent crop.
Plant Care: If your cucumbers are going to be lying on the ground, then lay them on a covering or straw to protect from the wet soil; this will also act as a mulch to prevent drying out. Hanging Cucumbers may have to be supported on the vine to prevent damage to the plant.
Cucumbers need constant watering as inconsistent watering can result in a small, bitter plant. However like most vegetables they will not tolerate over-watering. To avoid this, a quick tip is to stick your finger into the soil and if it is dry beyond the first joint then water is needed.
Harvesting: Keeping your cucumbers harvested regularly will ensure a constant supply of fresh cucumbers. To maintain a healthy crop you should harvest when they reach 6 inches and over; or if choosing to pickle them, around 2 inches is ideal.
Keep picking them as they grow on the vine as the vine will stop producing if they are not picked, and those that remain will become tough and slightly bitter.
As they are 90% water, cucumbers are better stored wrapped tightly in plastic film. They will last at least 7-10 days in this condition if stored in a cool place.
Green Runner Beans:
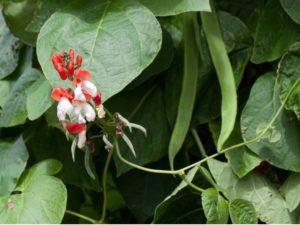
Growing runner beans (Phaseolus coccineus), is one of the most satisfying jobs around the vegetable garden for me. The reason I am enthusiastic about runner beans is that I am quite impatient by nature, and so can’t wait for the crops to grow. This is where the runner beans come in handy – they grow so fast !
No sooner do you have the frame up, than they are reaching for the stars and in no time producing tasty beans. When planting runner beans, like any other plant really there are however a few steps to follow in order to get the best results.
Soil Conditions for Runner Beans: Runner beans prefer a loamy soil mixed with a good compost mix, however they are a fairly forgiving plant and will grow in many soil types. Since beans take nitrogen from the air and deposit it in the soil, they need less fertilizer than most other plants and indeed are used in companion planting methods for this ability to deposit valuable nitrogen for other plants to benefit from.
Plant in full sun if possible, though some shade will be tolerated. They should be kept away from the wind, as they are likely to suffer from wind damage if too exposed.
STRAW BALE GARDENING BOOK
Time for planting beans: The time to plant your runner beans is after the last frost of the season, as runner beans are very susceptible to frost damage. Better to grow from seed in a cold-frame or greenhouse and then plant the young seedlings into the garden area. If there is a danger of a late frost, then it is better to cover at night with a light fleece to protect them.
Preparing for planting runner beans: Before planting your runner beans, it is best to prepare the frame-work that will support them whilst growing. Mostly this is done with a wigwam type of frame, made up from several canes attached at the top and tied around with string.
The runner beans are then trained to grow up the canes, securing as they grow. This is slightly different from Peas which will secure themselves with tendrils from the plant.
If planting seedling’s then remove from the pot when they are well rooted, but not pot-bound in the container. Taking a small trowel, dig a hole big enough for the plug and place the plant in the hole, firming around the base with soil.
Planting out under a cloche for the first few weeks of growing will also protect against the frost and give them a quick boost as the soil warms up.
This will also protect your young plants from the birds. Pigeon’s in particular can do a lot of damage to a young bean crop, if it is not protected. Another way of protecting the early plants is to cut the bottom of a plastic coke bottle, and place over the plant (make sure you remove the top ). Naturally this system is a bit more difficult if you already have your canes in place, so think ahead to exactly how you plan to proceed.
Rodents just love to nibble on a tasty bean ! Watch out for these and if it is a problem try covering with fleece to distract the mice during the early stages of growth. Many a bean crop has been destroyed by mice digging up the bean even before it has had a chance to sprout!
Planting your beans or peas within a cardboard toilet-roll holder is a great way to protect against cutworm and even mice! The cardboard will gradually rot away, but should last over the growing season.
Caring for your Runner Beans: Generally speaking, runner beans need very little looking after, during the season. Water well when flowering starts in order to encourage growth. For the bushier type of bean plants, nip out the growing tips as they reach the desired height. Watch out for aphids, or caterpillars and take action at the first signs. Aphids can soon get out of control and be the cause of all kinds of plant disease, as well as contaminating your beans with a sticky mess !
Harvesting your Runner Beans: All bean crops should be harvested when still young and small, for as they grow they can get quite tough and fibrous. Likewise they are best eaten immediately, or if headed for the freezer they should be blanched and frozen within the first few hours of picking to get the best flavor locked in.
Keep harvesting quite frequently, even if you do not need the beans. This encourages growth and ensures a steady supply of fresh succulent runner beans for the table. Beans can also be dried and stored for use in stews and casseroles, throughout the winter period.
**Follow the same general advice for planting garden peas also.
Leeks:
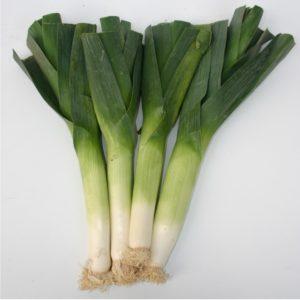
Leeks are probably one of the most sought after vegetables for the kitchen table, and knowing how to grow leeks essential for the vegetable gardener.
producing a delicious long white bulb, as well as green leaves that can be used to flavour casseroles and soups, as well as countless other dishes; the leek is rich in vitamin A and so a great addition to the average diet.
The leek is of course the national symbol of Wales, as is the Thistle for Scotland, the Rose for England and the Shamrock for Ireland. As such, it is a well-known vegetable around the United Kingdom in particular.
Along with the decision to grow leeks, come’s the decision on whether to grow from seedlings or indeed whether to grow your leeks direct from seed. This is along with the kind of leeks you wish to grow, and the ground conditions etc that are necessary for a good crop. These and other facts about growing leeks, will be explored in this article.
Ground conditions: Leeks will grow in a wide mix of soil conditions, however to grow a good healthy crop of top leeks, there are certain rules you must follow – as is in fact the case with most plants of course.
First of all, it should be noted that the one ground condition that leeks do not thrive in, is boggy ground. So choosing good well drained ground in which to plant your seeds or seedling’s is a first step to growing leeks.
Secondly, to produce the best crop, leeks should be grown in ground that has been heavily manured the previous year if possible. The reason for this is that if you plant leeks in freshly manured ground, then you will produce a very leafy crop which can be quite tough and stringy. Well-rotted compost is ideal to dig in before planting your leeks if organic matter is needed to enrich the soil.
Sowing Leeks – From seed: If you are Sowing leeks from seed, then they should be sown very thinly about 1 inch (25mm) apart, in drills about 6 inches (150mm) apart. Plant just about 1/4 inch below the surface and lightly cover up. Sowing should be in the early spring around April time. If sowing direct into the seed bed, then placing a cloche over them for the first three weeks or so will encourage early growth as well as protecting from a spring frost.
After about two-three weeks, the leeks should have germinated. The next step is to thin out as soon as possible, so that the leek plants around two inches apart. When the plants are about 8 inches high in the early summer, then they are ready to plant in their permanent positions – if they are not already there. In any case they must now be thinned out to about 10 inches apart.
When re-planting your seedlings, use a dibber or a sharp stick to make a hole around 6 inches deep by two inches wide. Take your leek plant and trim the roots down to about one inch long (25mm) and clip just a little of the top of the leaves. After placing the leeks in the holes, top up with water. This will wash the soil around the base of the roots and enable the plant to get established quicker. Fill in the hole around the young plant.
How to grow leeks – in a trench: Another way of growing leeks is the trench method, this is done by simply digging a trench in the planting area, about 1 foot deep (250mm) and placing about three inches of well-rotted manure at the bottom. The manure should be covered by about 6 inches of soil. Carefully plant the leeks as described above and be sure that they are firmed around and perfectly upright. Plant about ten inches apart. If more than one trench is required, then dig them about two feet (600mm) apart in case the sides collapse during the work.
Caring for your leeks: During the growing period, the leeks need minimal attention to be sure that the weeds are kept under control, by lightly hoeing between them. This helps to keep the soil loose which in turn helps with moisture retention. Another thing particular to leeks is Blanching.
This is a process designed to keep a nice length of white soft edible leek at the stem of the plant. Rather than letting it all go to leaf. One way to do this is to raise up the soil around the leek as it is growing, similar to the way that a potato harvest can have the drills raised around the young plants, to encourage growth of the tubers and also to stop the potatoes becoming exposed to the sun.
The problem with blanching your leeks is that they can become subject to rot, especially if the soil is particularly wet. This can however be prevented by fitting a collar to your leeks. This is simply a tube about 3 inches in diameter and up to 12 inches long. Push the collar into the soft earth around your leeks at or near the end of the growing season, usually around mid to late August, depending on the weather.
The collar can be made from almost anything, even brown paper tied on with elastic bands. The soil is then piled up against the plant as described. Taking these steps will help ensure that your leek harvest, which should be ready from late August right through to the late spring, is in peak condition and ready for the pot !
Leeks grown like this with a long white tuber, makes an absolutely tremendous ‘leeks in cheese sauce’ dish – one of my favourites.
Harvesting: This should be done as and when you need them, leaving them in the ground until needed. Dig the leeks up with a garden fork, rather than just pulling from the ground, as this will result in you holding onto nothing but a handful of leaves! If you have to harvest them all, then store either in a box of sand in a cool place; or keep in a cool trench at the side of the plot if you need it for another harvest. Cover the roots lightly with soil, and pick when you need them.
Leek bulbs: A handy by-product of leeks that have been left until the following summer, is leek bulbs. If the leek has gone to flower, then simply nip out the flower stems to get a nice harvest of leek bulbs at the stem of the plant in the summer. These can be used as onions or shallots for casseroles and stews etc.
Onions:
To begin with, we must decide on whether to grow the onions from seed or from onion sets. The fact is that it is generally thought much easier to grow onions from sets rather than from the seeds themselves.
It is also more likely that you will have a successful onion crop if you grow from the onion sets, unless you are a more experienced gardener and are well used to the intricacies of germinating and growing vegetables from seed.
How to grow onions – from sets: As mentioned, it is generally thought of as a more guaranteed way to produce a good crop of onions, if you grow from onion sets. There are a few basic things to go think about, before you simply plant your onion sets in the ground however. A few general rules of thumb to ensure your efforts are productive and the expenditure worthwhile, from both a financial and practical viewpoint.
Soil Condition: Firstly, it is not considered wise to grow onions in the same bed for more than 3 years running, unless the previous crop has been disease free, and the soil is well fertilized and able to cope with the demands of the growing onions. As with most vegetable crops, it is better to rotate your plants around the growing area if this is possible, in order to ‘spread the load’ and give each plant the best possible chance of solid growth.
Onions should be planted as early as possible (around late Feb) to give as long a growing period as possible, in a soil ph of between 6 and 7.5 and should be planted in ground, that is well raked out to produce a fine tilth for planting the onions sets into. Preferably you will have turned over the ground and added some well-rotted manure the previous Autumn, this will ensure a good strong growth in the spring – if not; then remember it for next year 🙂
Planting: After pressing down the area a little (onions prefer a firm bed), plant the onion sets about 4 inches apart, in rows set about 1 foot apart. This gives roof for the hoe when it comes to weeding between the rows. Plant the onions in a small hole made with the trowel, and cover them up to the neck in soil.
Planting them like this will help prevent them climbing out of the ground as the roots start to take hold; with that in mind however, you will most likely have to re-set then a few weeks after planting to be sure this does not happen. A small sprinkling of grow-more will help at this stage to give the onion sets a quick boost.
When planting onion sets in straw, you can use the method for seeds (cover the bale surface with soil), or press the onion set into individual prepared holes as described earlier. However I find that owing to the number of onions to a bale (16 or so), it is simpler and easier to use the seed method and simply press the onion sets into the soil.
Protecting from Birds: Onions are not susceptible to birds like pigeons, in the same way that say for instance lettuce or cabbage is. However they are prone to inquisitive birds like Blackbirds and Crows, pigeons etc, that will pick them out of the ground and leave them lying on the surface. This is only usually a problem in the early stages of growth, and when the onion sets are properly rooted it is not so much of a problem. Nevertheless, if you are badly bothered with this happening to your onion sets then it is as well to put a fine mesh over them to protect the sets in the early stages of growth.
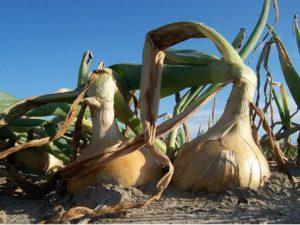
Harvesting: Onions are ready to pick, usually around August, when the foliage becomes yellow and withers. Pick a dry day if possible and lift gently from the ground, leaving the onions to dry where they are for a day or two. They are then ready to store in a cool dry place, where they will last through-out the winter – provided you keep them free from frost damage.
Storing: The dried withered Shaw’s can be pleated together, enabling them to be hung up in bunches from the ceiling of your garden shed for instance. After about two weeks of drying out, the onions are ready to eat and should provide you with a fresh supply for the next few months – if you have grown enough!
Quick tip: Eat the ones with the thick necks first, as they do not last as well.
Potatoes:
Potatoes are perhaps the best vegetable to begin with if you are a new gardener, or if you have limited experience of growing vegetables, growing potatoes included.
The reason is that potatoes grow in many types of soil conditions, and are fairly hardy against the weather, but do prefer cooler conditions. Once the potato shaws are through, they soon grow to block out any sunlight around their roots, which means that there is seldom any need to weed them, except in the most extreme of conditions – perhaps where the plot had not been properly weeded.
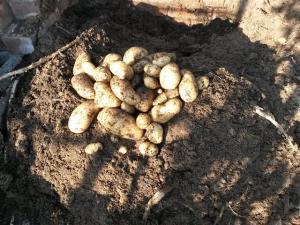
There can be few things more satisfying to a gardener, than digging up the potatoes at the end of the growing season. The reward for all your labours suddenly comes to the surface, it’s a bit like a treasure hunt really – except that this is a treasure that you have planted, and are now getting it back with interest !
Buying Seed: As well as knowing how to grow potatoes, you must know what kind of potatoes to grow. There are many different varieties of potatoes, some for baking, some for mashing. Potatoes that make the best fries etc etc. First rule though, especially to start with, is to find out just what varieties grow best in your area. The easy way to determine this is to go to a local supplier (not a large chain) as they will most probably stock the best varieties of potatoes for your specific region.
You must start with buying seed potatoes that are specifically reared for the purpose. You could just plant potatoes from the supermarket, however this is not such a good idea as they may have been sprayed with chemicals to prevent sprouting whilst in the shop for sale. You can in fact just plant potato peelings, if you are really stuck. As long as the potato peelings have an eye on them, they will grow – quite amazing really. I know I have in the past produced potatoes just from the peelings, though not the best crop – it is nevertheless possible, if you are on a very tight budget for instance.
Preparing Seed Potatoes: The seed potatoes will often have begun to sprout, before you even get them out of the bag; this is a good thing. If not, then cover them over with a sack or generally keep them in a dark cool place for a few days, until they have sprouted even an inch or so. This is known as ‘chitting’ and means that they are ready for planting.
Preparing the ground: Ground preparation for growing potatoes, is fairly straight forward. In fact potatoes are an excellent first crop where perhaps nothing has been cultivated before, as they are good for breaking up the ground. The soil just has to be dug over, preferably at the end of the previous growing season; and then raked out to pick up the worst of the stones and weeds.
When this is done, then simply string out a straight line, as a guide. Then run the corner of your Dutch hoe along the line to create a shallow groove. To this you can add a sprinkling of ‘grow more’ or general fertilizer, before placing the seed potatoes about 10 inches (250mm) apart along the groove.
Continue this procedure keeping the lines about 24-30 ins (600-750mm) apart, to allow for the next stage.
Planting:Place the potatoes shoot side up in the groove. It is often said to break away some of the shoots and just leave one or two, personally I don’t bother with that and just place them as they come. It doesn’t seem to affect my potato harvest either way.
When this is done, then pick up the Dutch hoe again and lift the soil, first along one side, and then the other. This will form a mound along the length of the track, in which the potatoes will grow.
Some people I know, avoid this step and just place the potatoes in the ground without forming drills along the line of the crop. In my view this is the lazy way out, and is a mistake as it will lead to a crop that is more difficult to harvest, resulting in broken potatoes. It will also mean a poorer harvest in terms of the potatoes produced.
Back to creating the drills. After the first lift, then you wait until she shaws present themselves through the earth for a couple of inches. Go over the drills again with the Dutch hoe, and lift the soil to cover the new growth.
That’s it, job done! As the potatoes grow then water them if need be, and look out for any predations of any kind. All being well then you can look forward to a harvest of great fresh grown potatoes in the Autumn.
For planting in Straw. After the priming stage is complete simply sink the potato down into the bale until it’s about 6 inches from the bottom, Being careful not to break away any shoots in the process.
Make sure at least one eye or shoot is pointing upward. Do not close up the channel above the potato entirely so that a little light gets through to the seed. This means that the plant will push up towards the light.
As the potatoes are grown from the stem of the plant rather than the roots, you will have potatoes all the way up to the top of the bale. This is in effect the same idea as growing potatoes in a barrel or tall container.
To harvest the potatoes simply cut away the string around the bale when the plant has died away at the end of the season. The bale can then be pulled apart to expose your potato harvest.
No more slicing the tubers with the garden fork!
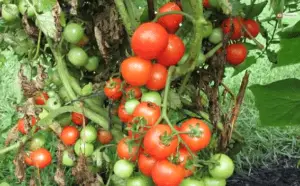
Plant Care: One word of caution is to look out for the signs of potato blight. This is a virus that can sometimes attach to and destroy your crop, and usually takes effect just before harvest time. The first sign of potato blight is a sudden yellowing of the leaves, which soon begin to rot and fall over.
This is a disease that starts in the leaves and goes down into the tuber itself. Rather than try to prevent this happening, which is very difficult. I often harvest the entire crop before the disease has time to infect the potato. Ok, the potatoes may not have grown to their fullest potential, but at least I will have a partial crop of good healthy spuds.
An easy way to tell if it is too late, is to cut one of the tubers in half. You will see a dark vein throughout the tuber itself. If this is the case then simply dump them – not in the compost tip though, as the virus can remain in the soil for years. If you try and store potatoes that have the potato blight in them, you will find that they will rot down to a smelly mush – really does spoil your day if you reach into a bag for your potatoes and you sink wrist deep into a rotting spud!!
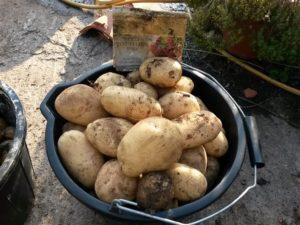
Harvesting/Storage: Potatoes can be harvested throughout their growing cycle, as soon as tubers begin to appear; this is particularly the case if you are happy with small ‘new’ potatoes renowned for their flavour. However to get the best out of your crop, wait until the leaves and shaws dry out at the end of the growing season, then lift with a garden fork – removing as much of the soil as possible before storing in a cool frost-free place.
The potatoes will last right over the winter if protected against the frost. This can be easily achieved in a barn or shed by covering with straw or sacking.
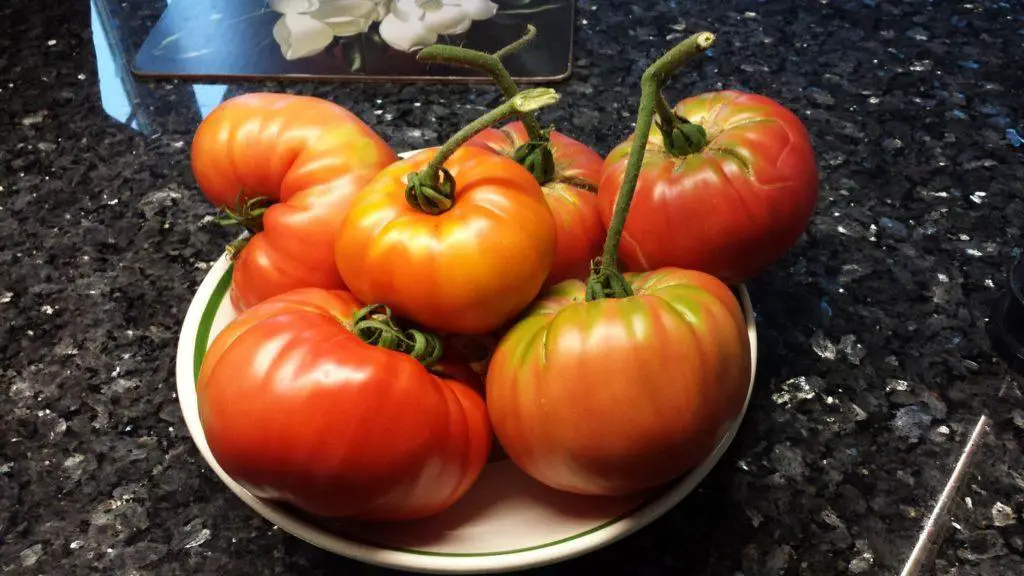
Tomatoes:
Growing Tomatoes, or any vegetable for that matter, can be a very rewarding and satisfying thing to do. Not only do you have the satisfaction of eating quality vegetables produced by your own hand, but you can also save a small fortune on the shopping bills as well – a real win, win situation.
As always when growing any vegetable, we must first of all decide just where we plan to grow them, For instance growing tomatoes outdoors in the deep south of the USA is just a little different from growing them in Scotland where they definitely need the benefit of a heated greenhouse!
Soil conditions as well as weather or temperature conditions, have always to be taken into account. Tomatoes thrive in full sun and in a temperature of between 70F / 21C and 89F / 29C, and thrive best in a well fertilized soil especially when the fruit is starting to grow on the stems.
Planting: Although they can be grown from seed – which will give you a better choice of varieties – I find it preferable to buy the young plants at about 6-8 inches tall and transplant them into the prepared area.
They prefer well-drained compost with plenty of organic matter and well-rotted manure. Support will have to be provided in the form of canes, string, mesh or tomato cages. This is especially so in the beefsteak varieties (some weighing up to 1lb), that will produce a crop liable to put a heavy strain on the stem if not properly supported.
When feeding organic Tomatoes – which should be started when the first fruits start to appear – I always prefer a ‘Tea’ mixture of horse manure mixed with water, when it comes to ‘feeding time’, which would be about a ladle full once or twice a day when the tomatoes are in full growth. It goes without saying that care must be taken when handling any kind of manure or rotting material.
The cleaner way would be of course to just go for a more commercial tomato feed – there are loads on the market – however just as many precautions have to be taken when handling chemical feeds also, so I suppose it’s a matter of choosing your ‘poison’!
Organic growing methods are most certainly in the ascendancy though, and feeding methods I used as a boy to save money, are now all the rage – go figure.
Greenhouse Tomatoes: Quite apart from the fact that tomatoes have to be grown in greenhouses in m any northern regions that are not warm enough for them; growing tomatoes in a greenhouse means that you can start a lot earlier in the season, just make sure that you have a small heat source going to keep away a late frost or the cool spring evenings.
Tomatoes can be grown in many types of containers, indoors and out. However be aware that they cannot stand frost at all, so be sure to protect them from it at all costs.
As the season progress and the temperature heats up, then it is time to open the vents to try and maintain a constant temp around 80F or so. Care must be taken to water them regularly, and try and avoid splashing the leaves of the plant as this will result in the leaves being burned in the hot sun.
As the plants grow, and the tomatoes start to show, then I would normally trim away the excess leaves about halfway up the plant. This will concentrate the plant on producing tomatoes and not just filling the leaves. Side shoots should also be nipped away using your thumb and forefinger, as they will just take energy away from your tomatoes in the main stem.
Avoiding pests: Pest control is an on-going labour for all gardeners, without doubt. Growing tomatoes in a greenhouse means that they are perhaps not quite so prone to the ravages of caterpillars, they can usually be fairly easily spotted and disposed of if they do appear. However Tomato plants are very susceptible to the ravages of Aphids such as greenfly and blackfly . To control Aphids with the use of chemicals is probably the most popular and perhaps the easiest.
It has to be said however that any chemicals that you use on your food plants, is likely to remain to some degree at least on the fruit or vegetables treated. The solution may be to go Organic and consider other alternatives to chemicals, such as a tablespoon of Canola oil and a few drops of Ivory soap into a quart of water. Shake the mixture well and pour into a spray bottle. Spraying from the top of the plant down, be sure to get the underside of the leaves for critters hiding there.
Support: Just to emphasize the advice above – there is no definitive way of supporting your tomato plants as they grow, but they must be supported. Canes are the most popular, although string set into a spike in the ground at the tomato plant base and tied to a supporting beam in the greenhouse roof works just as well.
Make sure the plants are well tied to the string or cane – without choking the stem – and that the weight of the tomatoes does not pull them down.
Growing Outdoors: Growing tomatoes outdoors is the privilege of those that live in warmer climates – unlike Scotland ! The principle however is pretty much the same.
The differences are mainly that the overall temperature cannot be maintained as well, and that outdoor tomatoes are more susceptible to the predations of pest’s such as caterpillars, slugs etc. In fact the main difference is that they are more exposed and so vulnerable you could say.
Feeding the tomatoes is the same as indoors, although if you have a good fertile soil then it may not be so often. Insect control is of course on-going, and birds will have to be kept at bay by garden mesh. As for the predations of Rabbits, they do not seem so keen on tomato plants, but they will chew on them just for the hell of it – so best to keep them away by any means possible.
Harvesting:Tomatoes are best eaten within days of plucking in order to get the best flavour possible; however if storing simply place in a paper bag and keep stem-up in a cool dark place.
Contrary to popular belief green tomatoes do not ripen well on a window sill – they are more prone to rotting.
Best time to pick is when the tomato is firm and bright red (or yellow?) in color – depending on the variety of course.
They can be kept in the fridge for a few days, but in doing so you will lose much of the natural tomato flavour.
From The Author:
Vegetable Gardening has certainly grabbed the imagination of the public in a way that I have never witnessed before. Whether this is because of the cost of food, or the environmental issues involved with growing vegetables commercially – or indeed whether it is potential ‘Preppers’ getting themselves prepared for Armageddon in one form or another; I really could not say.
More probable is that it is a combination of all three! Whatever the reason though, it is very welcome in my mind because at last folks are awakening to the benefits in physical and mental health, in environmental awareness and in financial benefits to be gained.
With the ‘no-dig’ vegetable gardening ideas such as Raised Bed gardening, Square Foot gardening, Container gardening and now Growing in straw; the ability to grow your own vegetables is open to just about anybody with the will to do so.
I sincerely hope that you have enjoyed reading the information contained within this book, and if you have not already done so – put the ideas into practice!