If you wish to lead a more independent lifestyle by growing and producing your own food. The option to build your own DIY Root Cellar is something that you should consider.
The fact is that if you are successful in growing your own food, then you can become a victim of your own success.

Some root vegetables it is true can stay in the ground for a considerable time and stay fresh. The problem with this solution is 2-fold. Vermin are likely to eat your produce for you as winter and hunger sets in. Or the ground might be frozen over so hard you cannot dig your veggies up!
With a good root cellar you can store your vegetables and keep them fresh for months on end – winter and summer!
What is a Root Cellar:
This is usually (but not always) a storage area created below or partially below ground. Here you can store the Autumn harvest for use throughout the winter months.
It can also double-up as a wine cellar or even a storm shelter. This last aspect is not to be underestimated. Particularly if you stay in areas that are prone to tornadoes!
In fact the main difference between a storm shelter and a ‘cave’ type root cellar is this. The root cellar has to be fairly high moisture content. A storm shelter has to be dry for habitation purposes.
For a root cellar your are aiming to create a cool space where the temperature stays a constant 32-40 degrees F (0-4.4 C). And with a humidity level of between 85-95 percent.
This combination of humidity and coolness. Means your vegetables will not go wrinkled as they can do in a fridge. They will also stay crisp and fresh.
Is a root cellar expensive to make?
Traditional stone or block built cellars, or cave root cellars can be expensive to make. This is because you have a lot of ground preparation as well as materials and labour costs to consider.
There are however cheaper root cellar options. These can still provide you with a usable and cheap cellar like those below.
- Basement Root Cellar: Basement Root Cellar. As the name might imply, this is a root cellar built into the basement of the house. With modifications made to create an effective root cellar area.
- Hole-in-the-ground Cellar: Hole-in-the-ground Cellar: A simple way to store root vegetables over the winter months.
- Garbage Can cellar: A garbage can makes an excellent root cellar with just a few modifications.
- Fridge Root Cellar: This can be a cheap option if you have an old broken fridge. The insulating in a fridge is excellent. Even a fridge with a broken motor can be used for storing roots and other veggies.
- Chest Freezer: The chest freezer is another item that is often discarded because the motor is broken or the gas has run out. An excellent choice for a root cellar.
You can find complete details and more in the book. ‘ROOT CELLAR CONSTRUCTION’ by Norman J Stone on Amazon here(extracted with full permission).
Constructing a root cellar in the basement:
Basement root cellars are in most cases not ideal. This is because the very thing that builders do NOT want in or near the house is excessive damp!
A humidity level in a house of 85-95% would lead to horrendous problems with damp. This would lead to all sorts of nightmare problems around the house. Including mould, wet-rot, dry-rot and even insect infestation.
Most houses need a nice dry basement. Here they can store all sorts of house-hold goods without them suffering damage.
Many older properties, especially stone-built with deep cellars, have naturally damp basements. This is because the modern methods of damp-proofing the walls did not exist when they were built.
Damp Basement – Root Cellar:
To convert your damp basement into an effective root cellar is a simple process.
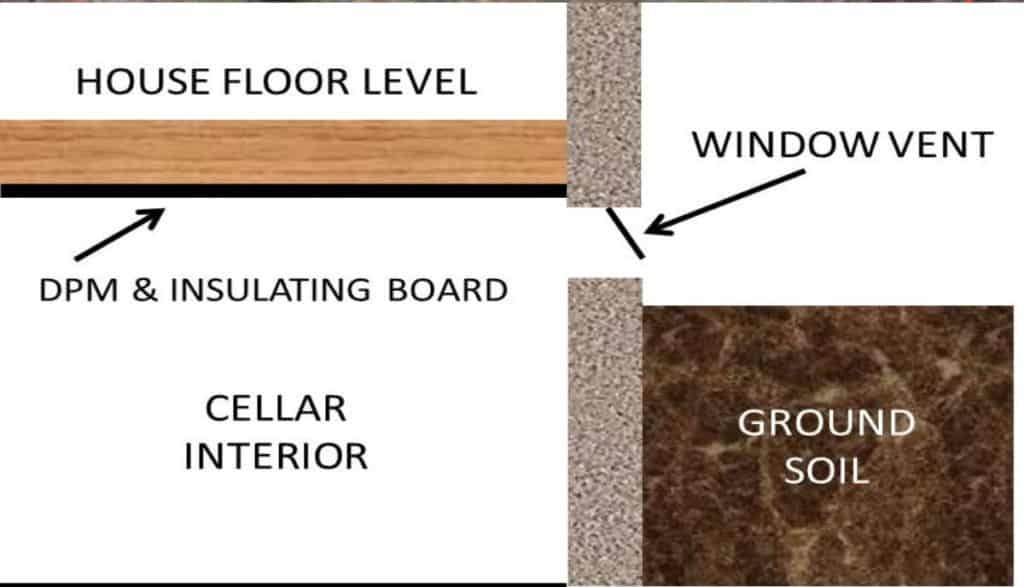
Make sure that the ceiling is properly insulated. Seal and separate the basement from the rest of the house.
This can be done with polythene sheeting and builders insulating board. At least inch thick, but 2 inches would be better.
If the basement walls are partially or wholly above ground level. Put 4 inch insulating board around the inside of the walls. Usually to achieve this assemble a treated timber 4 x 2 frame. The boarding is then fitted between the wooden studs.
A damp proof membrane is then tacked over the frame and finishing material overlaid. This can be Drywall, Plywood or whatever.
The walls can be left bare if you have the ground cover outside to prevent frost and heat incursion.
Ventilation is of course VERY important. You want the conditions to be just right for your root vegetables. At the same time venting excess moisture away from the interior of the house.
This can be achieved by incorporating a small window. This may already be at ceiling height in the basement. This will ensure a good flow of air throughout the cellar.
Access to a root cellar in the basement can be from the inside of the house. Also from the outside of the building as is the case in many properties.
Hole-In-The-Ground cellar:
This hardly needs explaining as it is indeed at basic level, a hole in the ground! But with that said, some further explanation would be in order.
First of all, there are all types of shapes and sizes when it comes to holes in the ground. It could be a simple trench dug out to accommodate carrots or other roots. Then covered over to protect them from the frost.
Or it could be a full-scale construction effort. Perhaps carried out with a back-hoe and built with concrete block.
If building a full-scale cellar. The construction details are the same as the details on the diagram for the cave cellar.
More thought has to go into the water table levels. And allowances made to install a lift-pump if the water table is likely to be a problem.
Also bear in mind heavy rainfall – where will the water run to?
Indeed any hole-in-the-ground cellar must take water and other factors (vermin) into consideration. Especially in the most basic storage facility (not really a cellar!) for potatoes – the potato clamp.
The potato clamp is the simplest way to store potatoes and other root vegetables. Carrots, parsnips, turnips etc if winter temperatures do not go much below freezing.
How To Build a Potato Clamp:
- Dig out a shallow depression in raised ground that is not subject to water-logging.
- Stamp down the soil with your feet, then insert a layer of straw 6 inches or so deep.
- Lay in your root vegetables, making sure that there is no damaged or diseased tubers amongst them.
- Cover the lot over with another about 6 inches of straw.
- Cover the mound with dry soil leaving a ‘chimney’ area at the top with straw poking out. This acts as ventilation for the tubers.
This simple construction is an effective way of keeping your root veg fresh. as long as it is not subjected to severe winter conditions below 23F (-5C)

To harvest a few potatoes at a time the idea is to go ‘down the chimney’ of straw and pick them out. Yet I find that it is best to make a few smaller Clamps and lift the potatoes all at once. Or make a rectangular mound and use it from one end, covering it up as you go.
Building A Trash Can Cellar:
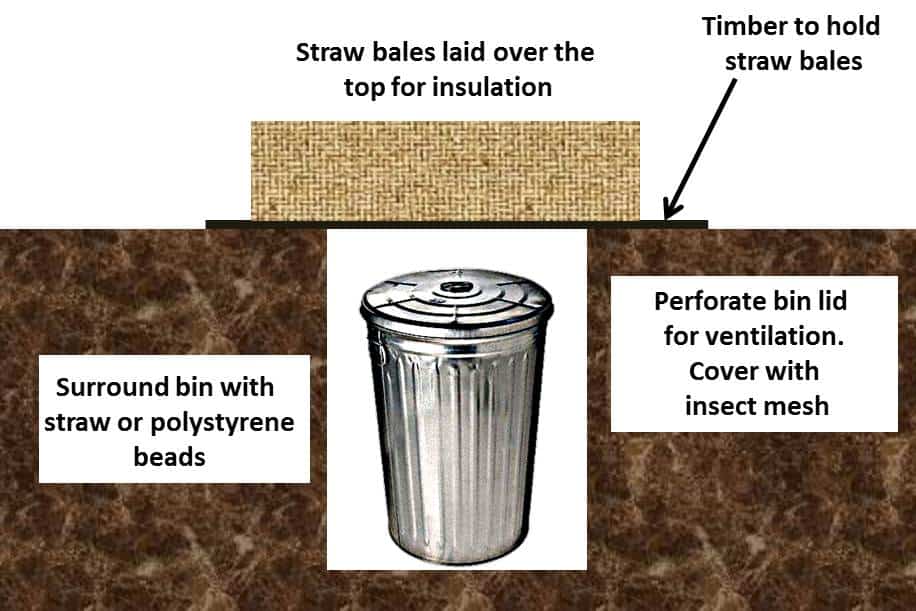
This is another form of hole-in-the-ground cellar, and is exactly what you would expect. Get yourself a good sized galvanised metal or plastic bin.
Make sure that it has a good fitting lid with the holes for ventilation covered with insect mesh.
Dig a hole big enough to take the bin so that it is a couple of inches below the ground. With a few inches clear all around then insert the bin. Fill around the outside with straw or better still – polystyrene beads.
Cover over with some timber suitable for the job, then lay two bales of straw over the top. This will insulate it from severe weather. The beads will protect it against a penetrating ground frost.
The trouble with this kind of storage is this. If the bin is too deep, then you can have some difficulty reaching the bottom as the tubers run low.
In fact it would not be hard to imagine you tipping into the bin yourself whilst trying to get the last of the potatoes!
The solution to this is quite simple – use a longer but shallower container in which to store your tubers. Volume or capacity can be the same, but access is much easier with a shallow bin.
In fact if you could use several small containers and store different vegetables in each. See the diagram below.
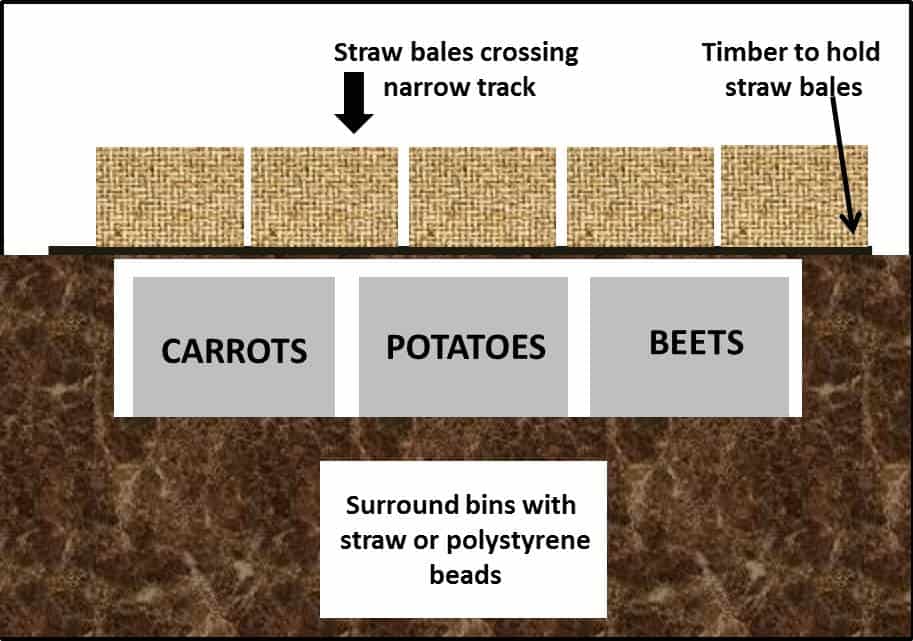
A rectangular track is dug out so that a straw bale is able to cover it with at least 6 inches to spare each end. This will ensure good cover for frost protection.
Insulate around and between the boxes to help with ground-frost protection. Be sure to make holes in lids for ventilation. The addition of a vent pipe from outside into the area itself would also be a good thing.
Fridge Root Cellar:
This idea has caught the imagination of many in recent years. I suspect with the emphasis on ‘Green’ living. And because the idea works!
When you think of it a refrigerator is already well insulated. The only difference is that now the insulative qualities are being used the other way around. And instead of freezing vegetables it is preventing them from being frozen.
More than that is the fact that a fridge-cellar is built to imitate the same conditions as a good root cellar. And that is air flow, humidity, and a cool temperature.
There are two basic choices when it comes down to it – the stand-up fridge or freezer; and the chest freezer. Both are good for the job; but the stand-up fridge does make access easier.
The chest freezer is easier to install. It simply gets sunk into the ground.
The downside is the fact that you are on your hands and knees to collect your vegetables. This risks you tumbling into the chest itself!
General Preparation:
There are a few things to take into consideration when using this method to store your root veg. With particular attention needed to safety.
The gas that previously operated the fridge before 1990 was Freon. Although not damaging to humans, this gas is now considered to be damaging to the ozone layer. As such it is illegal to vent it into the atmosphere.
If you choose to remove the pipework from the fridge then you must be able to remove them without damage. Failing this you must make a judgement call on whether there is any gas left in the pipework. And whether the best option would be to leave the pipes in place undamaged.
Fridge latches prior to 1958 used to include a catch which could not be opened from the inside. This proved to be disastrous especially with children. Fortunately this practice ceased by 1958 and a magnetic strip replaced the catch.
Whilst nobody should be able to suffocate in a well-vented fridge-cellar. it is still a good idea to remove any catches if they are in fact evident on your fridge.
Fridge motors and any other surplus-to-requirements materials should removed. This will at least make the thing lighter and easier to shift into position!
Preparing Your Fridge:
The fridge itself has to be prepared in such a way that it is properly vented and positioned for use.
This is best explained in the diagrams below. Here I have prepared a chest fridge/freezer and a stand-up fridge for use as root cellars.
Both are set raised up from the ground and vent holes drilled into the base, and holes or a pipe sunk into the tops.
Chest Freezer ‘Cellar’
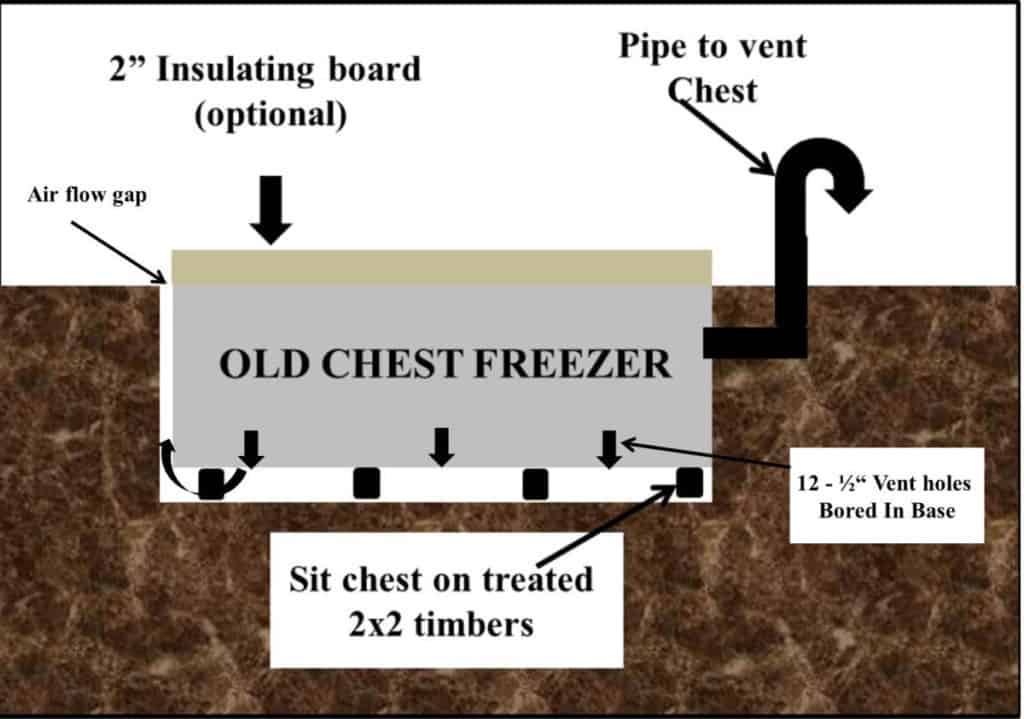
Choose the area in which to sink your chest freezer. Make sure that it is not at the bottom of a natural sump, but rather dug into a raised area if possible.
In this example a hole is dug in the ground to accept the size of chest fridge you have acquired. Plus an inch or two longer on the length or width for vent purposes.
Depth is calculated to allow the lid to be level with the ground surface including the height of your 2 x 2 batons.
Some treated 2×2 timbers are placed for it to rest on to stop the base rotting and to provide air-flow.
Venting:
I have also fitted a ventilation pipe into the end of the chest. This goes up through the soil to give a permanent vent to the inside.
The base is then bored with holes covered with insect screen to give the whole unit a free flow of air to the inside
As the chest is already insulated all around. There is no real need for extra external insulation below ground.
In the example above you can add a 2” layer of external insulating board in cold conditions. This can be stuck onto the lid with silicon sealer. This makes the lifting door easier to operate if the cellar is being used on a regular basis.
If it is for longer term storage and access does not have to be on a daily basis. Then it could be covered over with straw bales as in previous diagrams.
This simple design costs very little. But will give you an ideal winter storage space for all your root vegetables.
Stand-up Fridge ‘Cellar’
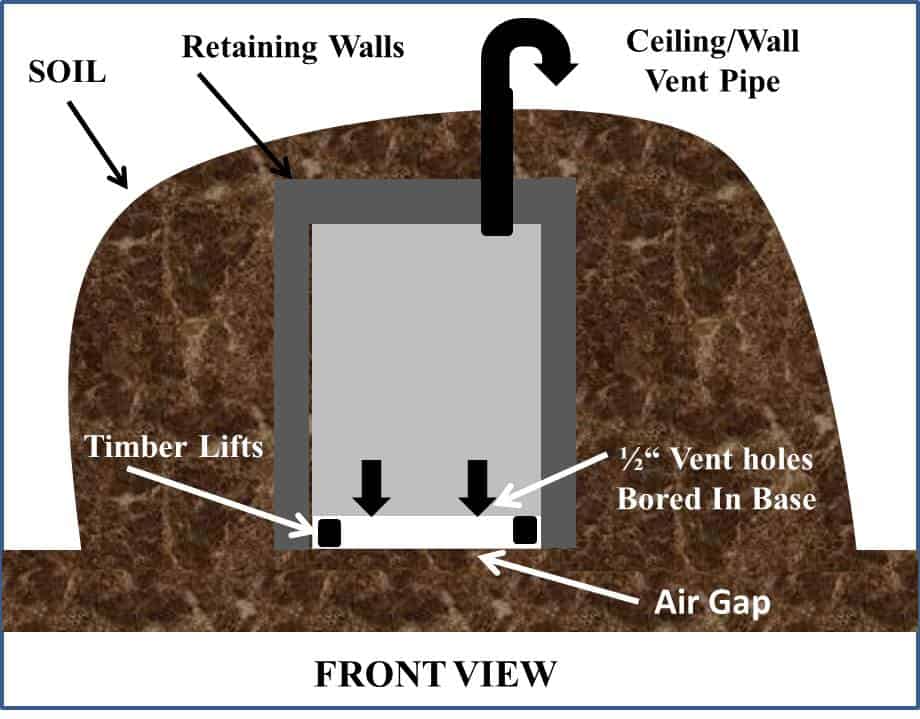
This design has the advantage in that you are not bent double trying to retrieve the contents. But it is slightly more technical regarding the installation. It also relies on you having a raised piece of ground to put it in.
In its simplest form this root cellar idea is quite straight-forward. Choose your location and then dig into the hillside. Deep enough so that the sides are the full height of your fridge plus at least 12 inches.
The problem arises if the hillside you are digging into is loose topsoil. Or is otherwise unstable. If this is the case, then it is all likely to shift forward in heavy rain and push your fridge flat on its face!
If the ground is rock and stable enough then no worries – carry on with the installation.
If there is a problem with loose or unstable ground then there is an easy solution. Build a retaining wall to hold it back.
Ok, it is a hassle, but at the end of the day it is worth it for the peace of mind if nothing else.
The wall can be either heavy lumber such as railroad ties (railway sleepers) or concrete block. Make sure if you are using lumber that it is well anchored into the ground.
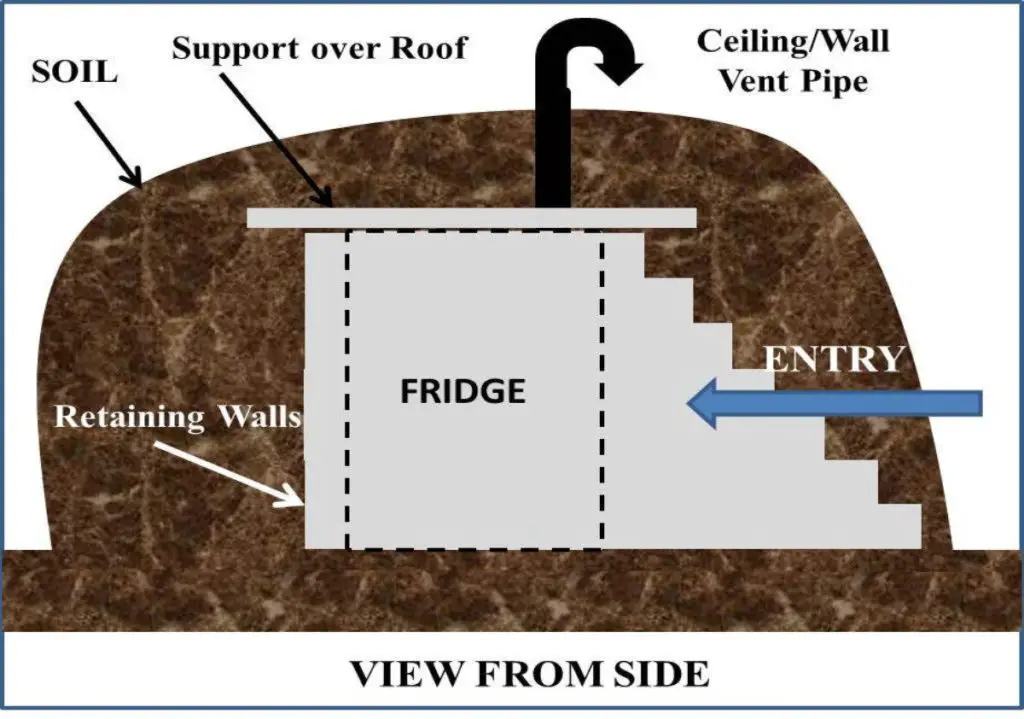
With this little illustration I have tried (with partial success!) to show a view from the side.
The fridge is built into a hillside. This means that you will have to deal with not only the ground to the rear, but also to each side and the top covering.
The sides are dealt with by extending your retaining walls down the side of the structure. This is so that you enter the front via a corridor in effect.
The side walls have the effect of not only retaining soil to the sides. But they also act as supports for the rear retaining wall.
Construct the top with by the addition of concrete or timber lintels so that they are laying atop the walls. Just higher than the fridge. This will take the weight of the fridge top as you cover over with soil.
As with the sunken chest, you can stick 2 inches of exterior insulating board to the door. This will increase frost/heat protection if needed.
How to store vegetables in a Root Cellar:
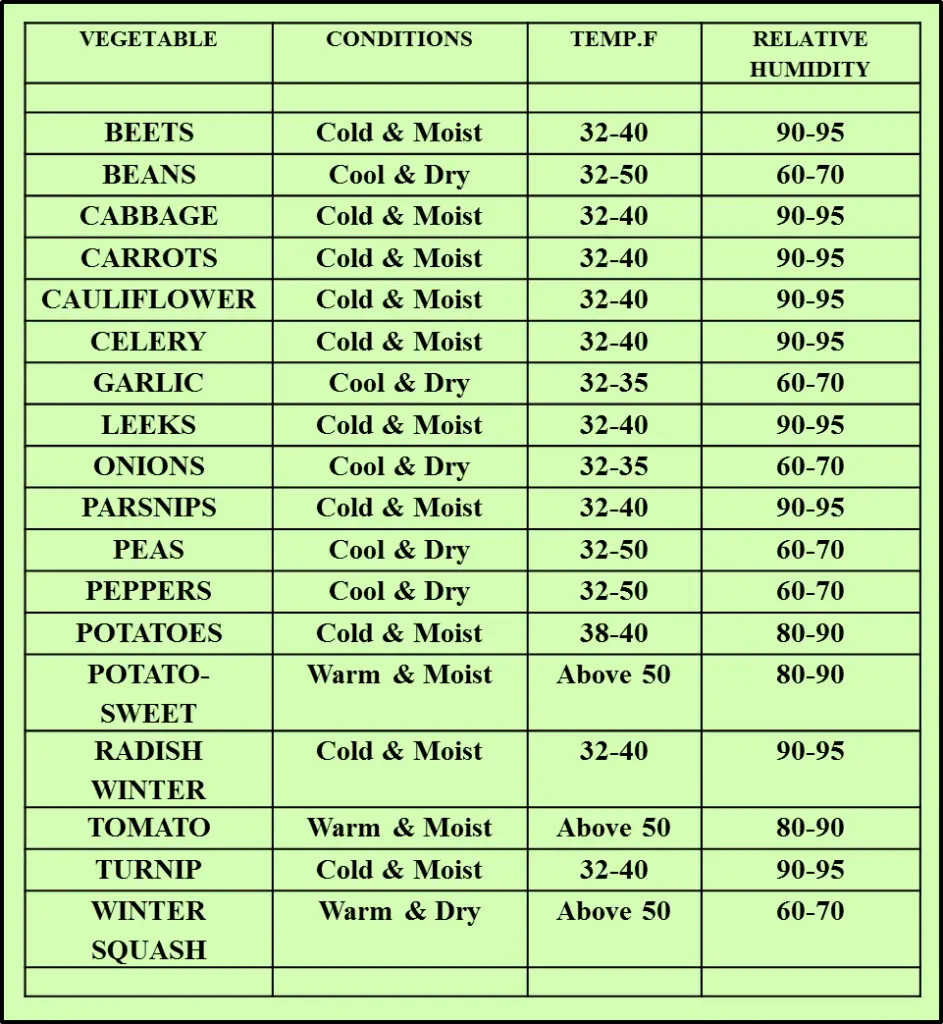
Of course it is absolutely pointless to build a root cellar if you have no idea how it operates. Or indeed what temperatures you need to achieve to get the best results.
The last thing you want is for your vegetables to get mouldy on the shelves. Especially because the temperature or ventilation was not enough for the job!
The chart below will give you some idea of the conditions that have to be in place for successful storage,
When introducing your roots to the cellar, there are a few simple rules to follow. This will maximize their chances of surviving, and your chances of enjoying a good meal!
Here are a few tips to follow…
- Keep them dirty! After lifting the crop, brush away any loose dirt or muck before storing. Do not wash the vegetables as this will increase the chances of them rotting.
Likewise do not store away vegetables that have been lifted from wet ground. Allow the skins to dry out in a cool dry place first.
- Remove the leaves of carrots, parsnips and swedes but with beets cut the leaves to leave about 2 inches. This will stop the beet from bleeding out.
- Sprouting – Do not pack apples anywhere near potatoes. The apples release Ethylene gas which will cause your potatoes to sprout.
- Shocking! Onions should have the stems broken and bent over a few weeks before harvest. This to encourage dormancy, otherwise it will continue growing after lifting.
- Store your root vegetables in boxes lined with sand or other loose material. Not too tightly packed for ventilation. Cabbages, cauliflower, pumpkins, squash etc, are best stored on wooden racks or shelves.
- Apples keep best when individually wrapped in newspaper and stored in a cool dark area. Be careful not to bruise the fruits when wrapping.
Summary:
The choice of what design you should use for your root cellar is something that needs some thought. Depending on how much you will use it, or indeed the financial implications involved.
The more expensive root cellars that are built into the hillside. Or perhaps a metal shipping container sunk into the ground, are very impressive it’s true. But, unless you have a load of produce to store they might not be economically viable.
If you are a ‘newbie’ to this kind of storage, then perhaps a trail with a Chest Freezer cellar would be a good start? Either way, I hope this has convinced the reader that a root cellar can be a viable project no matter what the budget.
ROOT CELLAR CONSTRUCTION ON AMAZON
Recent Posts
There are many vegetables that suddenly grow upwards and burst into flower or goes to seed. This is called ‘Bolting’ and it is generally something that the vegetable gardener wants to avoid...
Never Transplant carrots! If ever there was any doubt as to the wisdom of transplanting carrot seedlings, then the following pictures should put these doubts to rest :) I transplanted some...